How to install Titanium SDK to start building mobile apps
This tutorial will get you started setting up Titanium SDK and use it in combination with Atom as an editor on Linux, Windows and macOS. You can also use it with VSCode and the VSCode package.

Installing Titanium SDK
The current GA ('general availability') version of the SDK is 12.2.1.GA.
At first we need to setup Titanium SDK:
- command line tools (CLI) to compile the apps
- the MVC framework Alloy
- some useful tools
- the SDK
The main parts are installed using the node.js package manager 'npm'. Check https://nodejs.org/ if you need to install it.
General installation
The following parts are necessary to run Titanium SDK:
- node.js v20
- titanium / alloy node packages
- java jdk (11, 16 or 17)
- xcode
- Android SDK (we'll use Android Studio to install everything)
Node.js
At first you need node.js v20 (https://nodejs.org/). After that you can use npm to install the packages as a global package:
sudo npm i -g titanium alloyThen you can use
ti sdk install latestto install the latest Titanium SDK.
Java
Install JDK (e.g. openjdk) 11, 16 or 17.
Android SDK
The Android SDK is necessary if you want to compile an Android app. There are two ways to install it:
Android Studio
Download Android Studio and let it handle the SDK install.
Platform specific
Linux
Fedora
If you are using Fedora 26+ you can run the following commands to get the needed libraries:
# install tools and libraries
sudo dnf install nodejs npm git java-17-openjdk
Ubuntu
Ubuntu looks like this:
sudo apt-get install nodejs npm git gcc gcc-multilib openjdk-17-jdk android-tools-adbManjaro
sudo pacman -S npm nodejs jdk17-openjdk
sudo npm i -g titanium alloy
All distros
Adjust you .bash_profile or .zshrc:
export PATH=$PATH:$HOME/android-sdk-linux/tools:$HOME/android-sdk-linux/platform-tools:/usr/java/latest/bin
export ANDROID_SDK=$HOME/android-sdk-linux
export JAVA_HOME=/usr/java/latest # fedora
and run source .bash_profile to update the current session.
Android SDK
Install Android Studio and start a default installation. After that set the SDK folder with ti config android.sdkPath /home/user/Android/sdk and start building your apps.
Windows
Powershell
You can use this PowerShell file to install all tools. Run it in a admin PowerShell and make sure to enable the Windows dev mode in the Windows settings.
manual way
- enable "dev mode" in Windows in the security settings to run node scripts
- download OpenJDK from https://jdk.java.net/archive (11.0.2)
- extract the ZIP to e.g.
c:\programms\java\jdk-11.0.2 - set system JAVA_HOME variable to the same folder
- restart command prompt
Java
Download and install JDK 11 from http://www.oracle.com/technetwork/java/javase/downloads/index.html and set the JAVA_HOME env variable inside the windows advanced system settings (e.g. C:\Program Files\Java\jdk11)
macOS
Install Rosetta using softwareupdate --install-rosetta if you are using an ARM Mac.
Android Studio
If you use macOS Big Sur you'll need to run defaults write com.google.android.studio AppleWindowTabbingMode manual in a console so Android Studio 4.1.2 won't freeze when you create an AVD or download extra SDKs.
Java JDK
You can use brew install openjdk@11 or if you use a M1 Mac you can use the version from https://github.com/microsoft/openjdk-aarch64/releases/tag/jdk-16.0.2-ga
List available Java JDK installations:
/usr/libexec/java_home -Vselect a version
export JAVA_HOME=$(/usr/libexec/java_home -v <JdkVersionYouWant>)and put that in your .bash_profile or .zprofile
export JAVA_HOME=$(/usr/libexec/java_home -v 16)If you are using a M1 Mac you have to use this version: openjdk-aarch64
Homebrew's version only goes up to v11 and Oracle's v17 is not supported.
XCode
If you have issues with XCode like Unable to find an iOS Simulator check Xcode preferences->locations->Command Line Tools and make sure it is set.
Install Pulsar (and some useful Packages)
Installation
Go to https://atom.io/ and install the Atom editor.
Packages
There is an official Titanium SDK package. To use the latest version with pulsar your currently have to install it using the included pulsar package manager: ppm install https://github.com/tidev/atom-appcelerator-titanium
There are some other (older) packges which are not needed when installing the official one. But it is worth mentioning them:
| Name | Type | Features |
|---|---|---|
| titanium Language JavaScript (old) | Language | JS Autocomplete (non alloy) |
| Titanium Alloy (old) | add-on | All-in-one package Jump to definition Open related TSS Highlight |
Other useful non-Titanium packages/add-ons:
| Name | Features |
|---|---|
| Atom Beautify | Code beautifier (tss, xml, js support) |
| DocBlockr | A helper package for writing documentation |
| highlight-selected | Highlights the current word selected when double clicking |
| Linter-jshint | Linter plugin for JavaScript (this checks your JS code) |
| Linter | A Base Linter core with Cow Powers (does nothing by itself, it's an API base) |
| minimap-highlight-selected | A minimap binding for the highlight-selected package |
| minimap | A preview of the full source code. |
| pigments | A package to display colors in project and files. |
| highlight-colors | Alternative way to display colors in your code. |
| color-picker | Use a color picker dialog to select a color. |
| Platformio-ide-terminal | An active fork from previous terminal package for Atom, running in newer versions, complete with themes and more |
| Project Manager | Project manager |
| symbols-list | Will display all functions in a sidebar |
| sync-settings | Syncs Atom settings, plugins etc using Gists. Very handy if you have multiple machines and want to have the same settings everywhere |
| Terminal-plus | A terminal package for Atom, complete with themes and more. NOTE: will probably fail with newer Atom versions, try next |
| auto-close-html2 | Automatically close XML tags |
Create your first App
For this tutorial we are just creating an empty Alloy app using CLI and Atom.
Open a new terminal and add the following :
ti createYou will see a menu where you can select "Native app - Titanium SDK - set a project name - set an app id".
For the beginning, say no to the Test-service and Hyperloop.
You can also use the Atom package ti-create
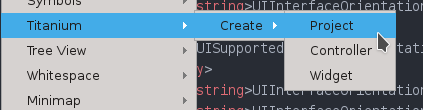
It will create a new project inside the folder that is open in the tree-view. 'Create controller/widget' only work inside an existing Alloy project ("Open folder" - select the project folder).
Compile your app
There are several ways to compile your app. You can use the simulator/emulator, deploy it to your device or create store apk's/ipa's. There is also a live test tool (TiShadow) which saves you a lot of time waiting for the compiler.
The CLI Way
# android to device
ti build -p android  -T device

# android build-only (good for testing)
ti build -p android -b --skip-minify

# android to store/file
ti build -p android -K /home/user/keyfile.keystore -T dist-playstore

# iOS simulator: will show a menu to select the size/device (e.g. press 8 for iPhone 5S
ti build -p ios -C ?

# iOS ipa/device/store: will show you a menu to select the different profiles
ti build -p ios --target ?
iOS related
To list all distribution names you can use:
security find-identity -v -p codesigningShortcuts
You can save yourself a lot of typing when you define some aliases (e.g. 'tq' will run the whole ti command to compile it and deploy it to the connected android device).
Linux / macOS
In Linux/macOS you open the .bashrc file and add the following aliases:
# Run on Android device, skip minification to speed up the build
alias tq='ti build -p android  -T device --skip-js-minify'
# Distribute Android for Google Play, specify the required keystores
alias tbs='ti build -p android -K /home/user/keyfile.keystore -T dist-playstore'
# Create an Android APK without installing it to the device. Grab from build/android/bin
alias tq_only='ti build -p android --build-only'

# Run on iOS, specify a device
alias tq_ios='ti build -p ios -C ?'
# Distribute iOS for the App Store
alias tq_ios_store='ti build -p ios --target dist-appstore'
then you can just write "tq" to compile and install on your connected device or write "tbs" to build an apk for the play store.
Windows
In Windows, the basic aliases command is not enough (you can't attach options in alias), so you must use .bat files or, a better solution, powershell aliases+functions. As you may want to have it permanently on your shell session, first you must create a powershell session file, the equivalent to .bashrc on Linux. So, open a PowerShell command line and do:
NOTE: You should need to activate the execution policy allowing scripts locally in order this solution to work. Open the powershell command line as administrator and type set-executionpolicy remotesigned
# Checking if profile exists
PS C:\> $profile
# If you cannot see/access the indicated folder, force the creation
PS C:\> New-Item -path $profile -type file -force
Ok, now you can open the Microsoft.PowerShell_profile.ps1 file and create your functions+aliases
Function appcBuildAndroid {ti build -p android -T device --skip-js-minify}
New-Alias tib appcBuildAndroid

Function appcBuildPlayStore {ti build -p android -K C:\Android\Mykeys\keyfile.keystore -T dist-playstore}
New-Alias tibs appcBuildPlayStore
The next time you open a PowerShell console, you will have available the aliases tib and tibs to compile for Android or for Play Store. Of course they are examples. Do as many as you want.
Here you can see a Windows Power Shell profile example, preconfigured: https://gist.github.com/mcvendrell/b4bacd36b834303a4e5f61afc947706a
TiShadow
TiShadow is another great tool by David Bankier (https://github.com/dbankier/TiShadow)
TiShadow provides Titanium developers the ability to deploy apps, run tests or execute code snippets live across all running iOS and Android devices.
It allows you to quickly test your app on multiple devices at the same time and 'compiles' quicker then building your app all the time (about 5 seconds to get your app up and running on an android phone, for a small app). Also it works over wifi, so you don't have to have your device connected.
Liveview
You can add --liveview to compile with liveview from command line
Link List
Here are some useful Titanium resources:
- Ti-Slack Join the community!
- TiDev
- TiShadow
- code examples
- official documentation/guidelines